Easy #dressBirk hack!
When I drafted the initial design for dress/blouse Birk, I wanted to create an easy pattern with lots of variety. I like to refer to my Birk design as a LEGO pattern because you can play around with the different pattern pieces to achieve different looks.
Now I've also tried to hack Birk to see if a rounded neckline with gatherers instead of applying the two bust darts could work - and I'm happy to report it certainly looks good! Furthermore, I also played around with creating curvy seams. I wanted to accentuate them by adding a contrasting bias binding to all the curved seams, including the bottom hemline, and I think it looks pretty good!


If you want to re-create a similar style with your Birk pattern, then follow my guide below:
Step 1:
Trace/print the original pattern pieces from the Birk dress. We will change the front and back bodice as well as the skirt

Step 2:
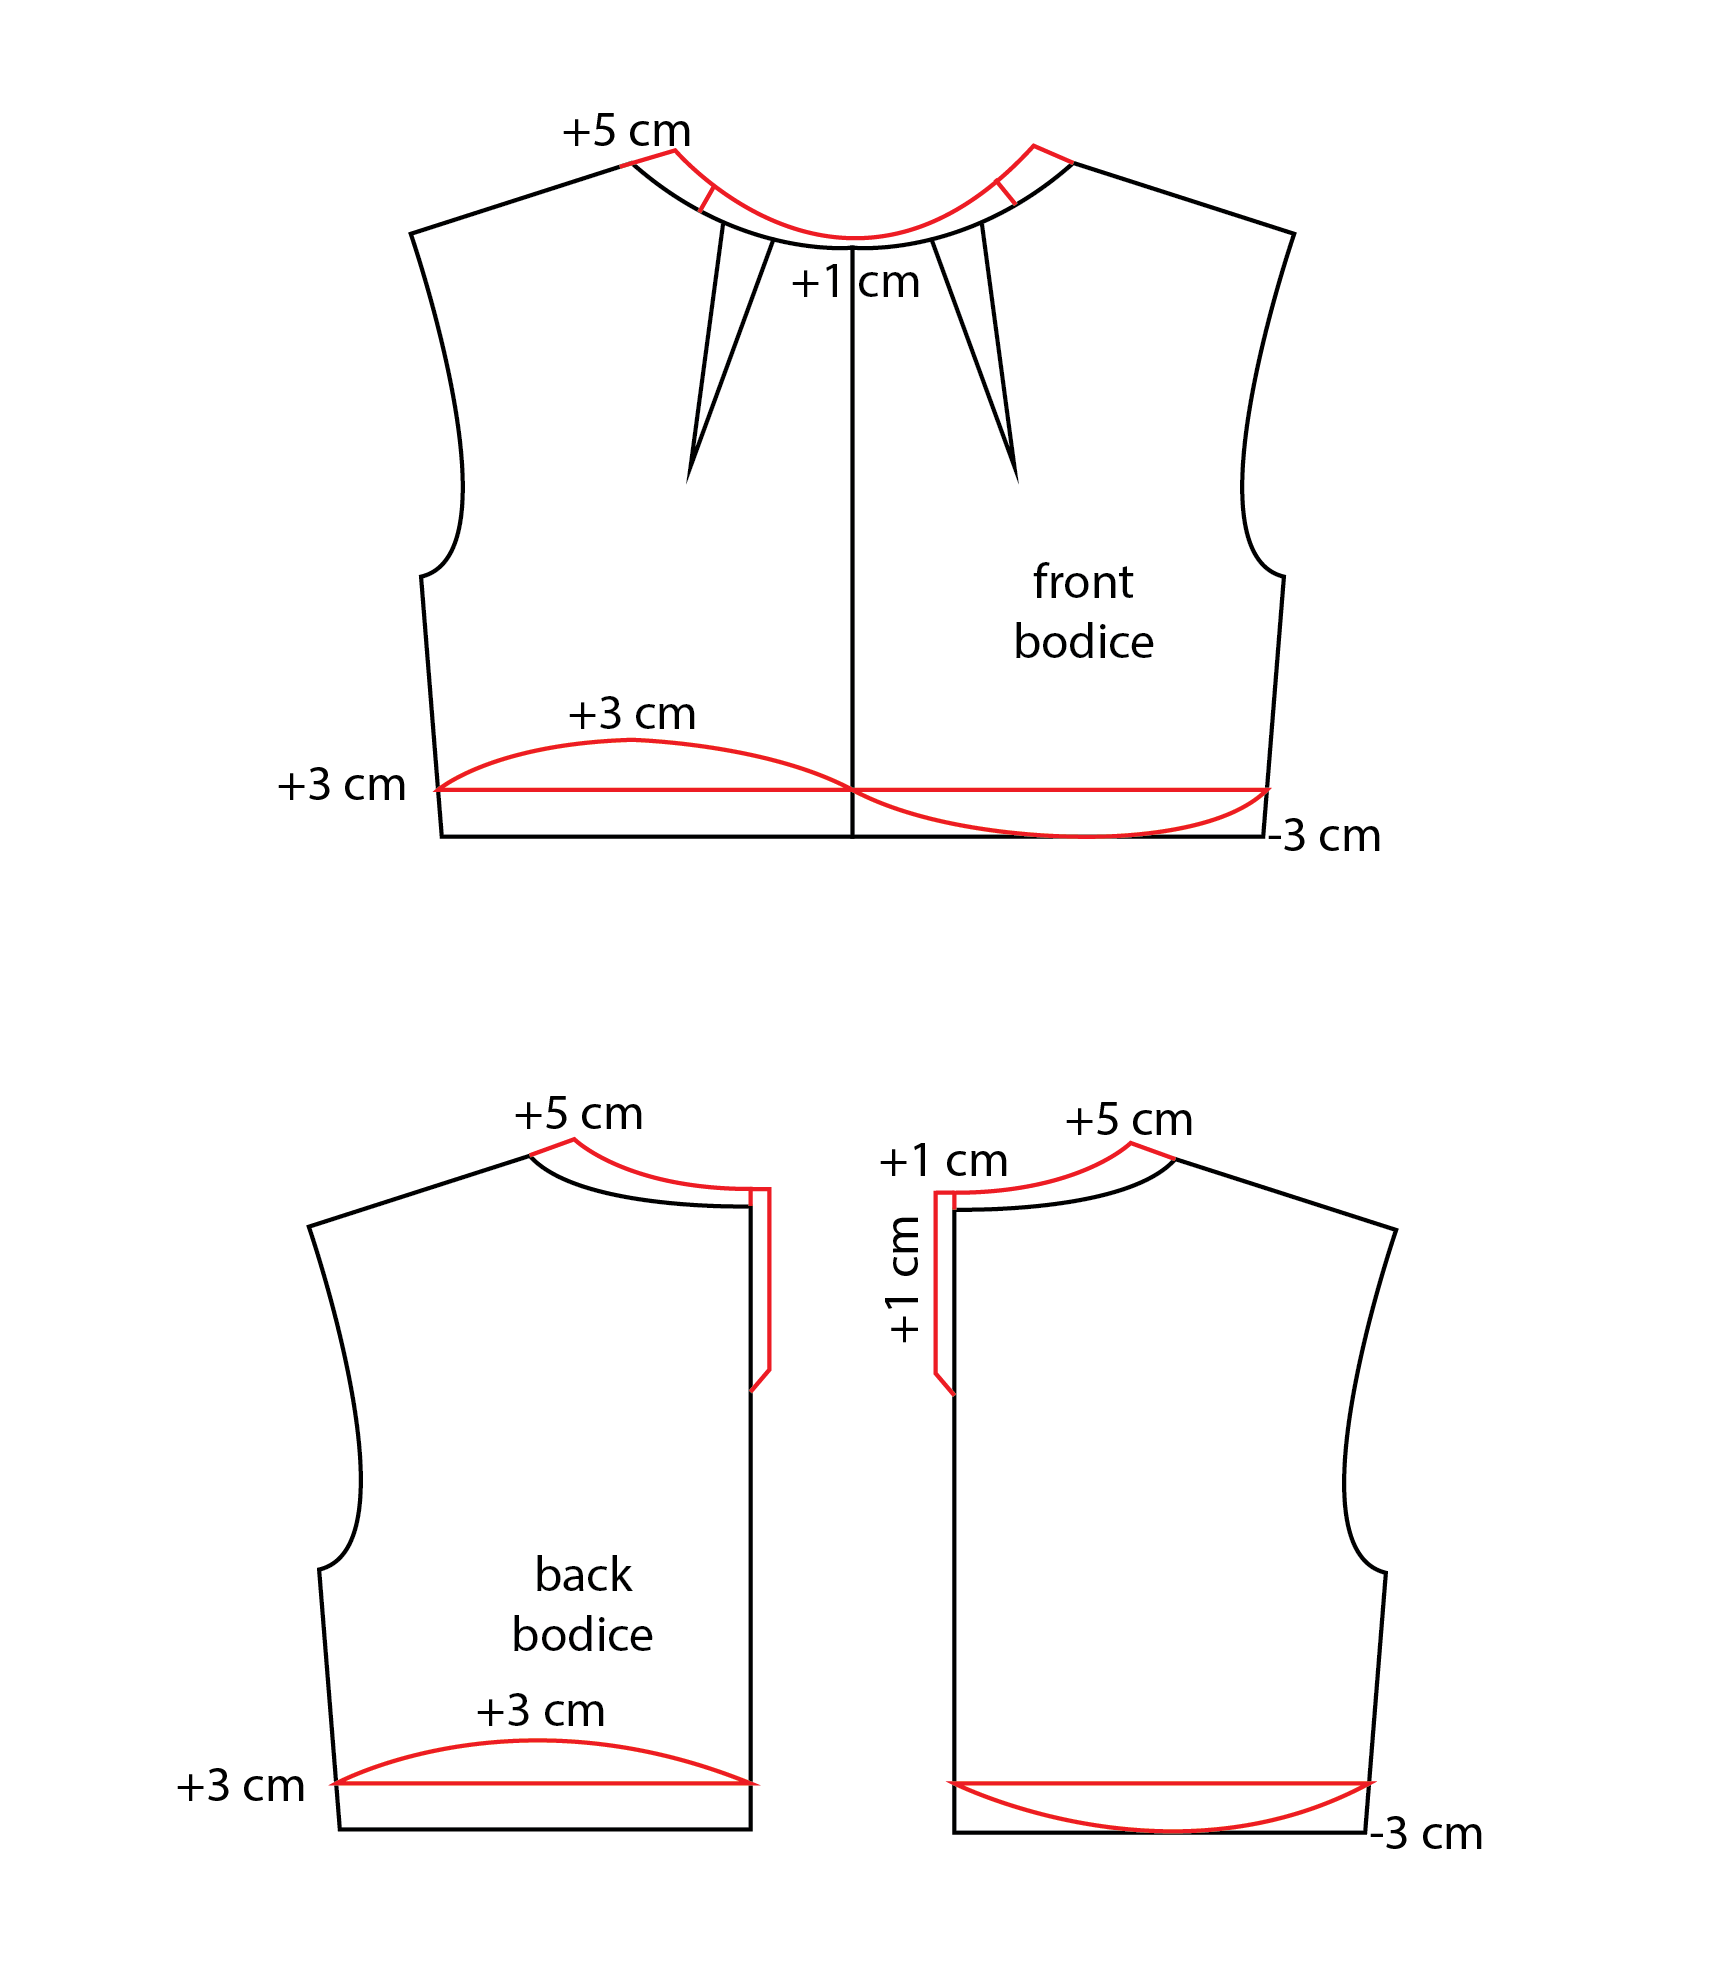
Mirror the front bodice along the CF line. Then extend the shoulder by 5 cm (2 inches) towards the neckline. You can also raise the neckline at CF by 1 cm (3/8 inch) if you want a tighter fit. From the highest shoulder point you should measure 4 cm (1.6 inch) down towards the neckline on either side. This is where the gatherers start and finish.
Measure the width of the two bust darts. This is the distance by which we should decrease the neckline once we make the gatherers. For example: if you make a size EU 42, the width of the dart by the neckline is about 5 cm (2 inches). So that means you should decrease the length of the neckline by 10 cm (4 inches) once you make the gatherers.
To make the uneven waistline you should draw a horizontal line 3 cm (1.2 inch) above the waistline. On the right side of the bodice (from the wearer's perspective) you should make a smooth concave curve that is 3 cm (1.2 inch) above the horizontal line right at the center of the right side of the bodice (so that's 6 cm (2.4 inch) in total from the waistline). On the left side of the front bodice you draw the opposite convex curve that touches the waistline at the center of the left side.
The back bodice is handled pretty much the same way. But instead of mirroring the bodice by the CB line you should make two separate back bodices. Extend the shoulder seam by 5 cm (2 inches) towards the neckline and raise the CB by 1 cm (3/8 inch). Then you need to draw an extra fold, which will work as a sort of placket, on the back bodice by both CB lines. This fold/placket will be folded 2 times 1 cm (3/8 inches) towards the wrong side when the bodice is sewn to get a nice looking back slit with a button closure now that the neckline will be to tight to get the dress directly over the head. The length of this fold/placket could be about 15 cm (6 inches).
The waistline on the back bodices are finished the same way as on the front bodice.

Step 3:
Find the skirt piece and mirror it along the CF/CB line. Then divide the skirt into two pieces, an upper and a lower skirt piece, that are about the same height.
Along the top seam on the right side of the upper skirt (seen from the wearer's perspective) you should make a smooth concave curve that rises 3 cm (1.2 inch) above the previous cutline at the center point. On the left side the curve is convex instead, dipping 3 cm (1.2 inch) below the previous cutline at the center point.
Along the bottom seam of the upper skirt the curves are mirrored relative to the top seam. So the right side sees a convex curve dipping 3 cm (1.2 inch) below the bottom seam and the left side sees a concave curve rising 3 cm (1.2 inch) above the bottom seam.
The lower skirt piece should be extended about 20 cm (8 inches) in width on either side of the CF/CB line. Afterwards the right side of the lower skirt is finished with a smooth convex curve that dips 3 cm (1.2 inch) below the top seam while the left side is finished with a smooth concave curve that rises 3 cm (1.2 inch) above the top seam.
Final step is to add seam allowances around all the edges (except the neckline which doesn't need seam allowance when it's finished with a bias binding). I always add a 1 cm (3/8 inch) seam allowance.
And there you have it! A design hack that will make dress Birk stand out from the crowd, especially if you add contrasting bias binding to the curved seams, like I've done.


Leave a comment
This site is protected by hCaptcha and the hCaptcha Privacy Policy and Terms of Service apply.